Introduction
Undercabinet lighting can illuminate and add a whole different ambiance to your kitchen. You might think that buying LED light strips is the only step you have to achieve that, well you’ve got it all wrong. Installation comes next after purchasing your undercabinet lightings.
However, did you know that the installation of under cabinet lighting will cost you a lot? So, here are a series of steps that will teach you how to install under cabinet lighting without professional help! Check them out below!
-
Choose Your Type of Undercabinet Lighting
Choosing your type of undercabinet lighting must come first before everything else. You have to be sure which LED strip lights are the best and have the right features that can work among the 4 types of undercabinet lighting mentioned below.
-
Light Strips
Light strips or tape lights are fully customizable that have LED light strips inside them. They don’t give off as much light as other undercabinet lightings. However, you can stick them easily with the use of adhesive tapes since they are thin and flexible. If you don’t want the wiring of the light strips to be seen, you need to ask for professional help so installing won’t be complicated.
-
Rope Lights
Rope lights are thicker than tape lights because they are composed of plastic tubes. The same with tape lights, they are not that difficult to attach because you can easily install them to an outlet. They also don’t give off as much light like the undercabinet lightings. Rope and tape lights are the cheapest and popular options for your undercabinet lighting.
-
Light Bars
Light bars or linear lights provide illuminating light to the cabinets than other undercabinet lightings. Aside from that, they are more permanent and won’t cost more. The light will surely spread out because bars are brighter and bigger. Although they are not thin, the use of fluorescent LED can make it last longer with less energy.
-
Puck and Button Lights
They are another type of undercabinet lighting that is also a good choice for even lighting. They are affordable and easy to install with battery-powered versions. Even if they are pointed at a certain direction, lighting is still spread all throughout the area beyond the space they’re pointed at.
-
Prepare Your Work Area and Installation Tools
If you come prepared with your chosen undercabinet lighting, you have to prepare your work area too. This includes turning off the main breaker box of all electric circuits, remove all the kitchen kit or appliances near your work area or around the cabinet, as well as the installation tools needed.
Wondering what are the installation tools you need to accurately install your undercabinet lighting? You only need a few of them, just make sure that you know how to use them properly.
- Non-contact voltage tester
- Screwdrivers
- Drill
- Hammer
- Cable staples
- Flashlight
- Electrical tape
- Wire Stripper
-
Layout the Location of Your Cable Lighting
It is important that you lay out first the cable wirings of your undercabinet lighting. This is to plan how you will run the cable from the power source to the cabinet. However, this mainly depends on the type of undercabinet lighting you choose. Just like the battery-powered lightings that don’t need an outlet for them to work.
Remember that even if this is a DIY process, it will still require you run wires, cut holes, and many more that involves electrical wiring. You have to fully layout and prepare everything to avoid any short or overload circuit. Consider hiring an electrician if this makes you uncomfortable to execute.
-
Determine Your New Outlet for the Electric Box
If your electric power outlet is far from the cabinet, you can make another one located right to where you want to place your cable. You can cut a hole which will hold your new electric box. Your old outlet can be moved to your new electric box by taking them out and disconnecting any wires that are connected to it.
-
Drill Holes in the Wall
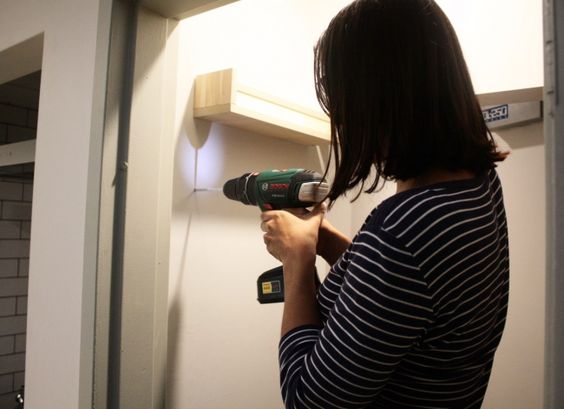
Light fittings come with a knock-out or holes that will let you easily run cables just by unscrewing the plate. However, you should drill the wall still so you can pull the cable into the hole to the box hole of the electric box. Grab the cable hanging from the small hole you drilled. Once you have the cable, pull it through the electrical box hole.
-
Attach the Light Fitting to the Cabinet
You have to screw the light fitting to the cabinet once the drilled holes are done. You can lock them through the use of grip in the knockout hole. After that, you can run the cable into the fitting. Get the cable that hangs from the small hole and run it into the hole of the fitting.
-
Secure the Wiring
Once the light fitting is placed intact, it is now time for you to secure the wirings. Strip the coating at the cable’s end first then connect them to the same color of cables in the light fitting. You can even check out the instructions given by the manufacturer that can be found in the manual.
Just in case you have a dimmer, you can also add them by fastening the dimmer and cover plate.
Conclusion
We know you’ve been dying to finally install your undercabinet lighting because of how they can illuminate your whole kitchen! Surprisingly, the things mentioned above are everything you could take on for the installation and surely you will have nothing else to worry about!